Quantcast
Channel: Theredneckengineer
Viewing all 52 articles
Browse latest View live

Texas, a good place to be.

$
0
0
I'm a bit late in posting about this, but I wanted to share a link to a fellow blogger's page and a great story I found there.

I don't always agree with everything Texas Fred has to say, but I still enjoy reading him, and I find him to be of like mind on a number of things. While reading his blog last week, I came across this post concerning the Texas Attorney General and his stance on federal level gun control.
Folks, this is a good thing. For far too long has the federal government trampled on the states' rights to self-govern, and it is encouraging to see my Attorney General stand up and say NO MORE!

I don't expect D.C. to respect it or even pay it any attention, but if more states were to stand up to the federal bully and put their foot down, gun control and nationalized health care would be a thing of the past.

Thanks to T.F. for the link.

The Mosin Nagant Archangel stock

$
0
0
Sure enough, for those of you out there that love you some M44s and 91/30s, here is a stock for your rifle that updates it and removes some of the ugly.

It's not the most attractive stock I've ever seen on a boltie, but it's still pretty good looking for what it is.
And, it has a 10 round detachable magazine.

More updates coming, life has gotten in the way again, as always.

Gun building....more than just a hobby.

$
0
0
There are a lot of folks out there who have followed my blog for some time, and some who have stumbled across it while searching for a variety of things, from Suomis to .50 bmg rifles to the Hi Point drum magazine conversion, and a few other things. Some people (read: most) never heard of me until they met me at a blog shoot or saw links to some of my builds at bigger gun sites like SayUncle, the Firearm Blog, Borepatch, The Warrior Class, and several others I know I'm forgetting.
My main thing here on this blog has never been politics or things of that nature, I'm a firearms enthusiast and I like guns, so I guess most people can figure out from there roughly where my politics lay. My point of blogging and throwing information out there has always been that if I can do it, anyone can. Beyond that, it was a build log of mistakes, failures, and successes for others to peruse should they ever decide to try their hand at making their own firearms. This post is, in part, a response to my long, rambling, nonsensical post about gun control. This is here, like this whole blog, to serve as a reminder that the weapon is not the tool in the hand, but the human mind and the creativity within it.

Lately, I've had very little time to dedicate to blogging; it's never been a day-to-day thing for me. My time is spread thin between work, family, school, and building guns. I've been building a LOT of AR lowers from 0% forgings recently, for obvious reasons, as well as AK receivers and a few other things. I've got a whole list of other projects I intend to start, some I wish to finish and sit on the leading edge of being done with (*cough* drums *cough*), but right now I'm having to redirect my time to certain things that are on the line, such as ARs and AKs. With that said, every chance I get to help someone into the home building hobby, I will take the opportunity and run with it, no matter what. Especially if that someone is a good friend, and a reader/commenter who just happens to be local to me. How does this tie in to what I've been doing?
Read on.

I am a member of what is likely the best firearms builders forum out there, the Weapons Guild. It's a private forum, but it's not. By that I mean that in order to see what is going on there, you have to sign up as a member, but you do not have to post anything unless you want to be part of the Band of Brothers. It is a community predicated on the idea that knowledge not shared is knowledge lost, and that we are all brothers in arms when it comes to fabricating firearms and related weaponry. I have met some of the nicest people there, and seen some really neat stuff built with everything from CNC machinery to files and dremel tools.If home made firearms and tooling are your thing, or if it even remotely catches your fancy, go over there, join up, and join in. Ideas flow freely amongst members, as do tools, parts, and help.
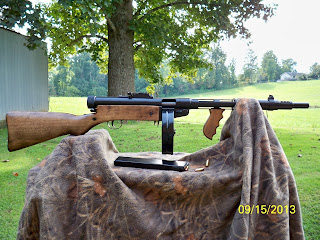
Recently, I hosted a build party at my house/garage, wherein several members descended on my little shop to collectively work on their own firearm projects. I am fortunate enough to have a good collection of tools, and have been blessed many times over to not only have these tools but to improve in my ability to use them. About 18 people showed up in total to have fun that weekend doing lots of bench racing and lots and lots of building. Suomis, AKs, ARs, Uzis, and others got built, barrels were turned to profile and made ready for chambering, and extra AK receivers were bent for future projects. I ran completely out of 4130 tubing for making Suomi receivers due to all the guys wanting to build theirs!

A couple of weeks prior, I was sitting in the parking lot of Campo verde with my good friend/reader/commenter Cormac, and he was outlining his confusion over how I am able to make gun building look so simple. I inquired of his interest in the subject, and he responded that he would love to learn how to build.....well........anything.
What is the easiest gun to build? Probably an AR15, right? Shoot, they literally snap together, after all.
But, what if we threw a wrench in the works and said that you could not start out with a prefabricated receiver, and instead had to machine your own receiver? I think that right there would scare off most folks. Cormac, on the other hand, is not most folks. The more he and I talked about it, the more interested he became in building something, specifically his own AR15. It would sure be something to try, and odds are he'd enjoy it, or at least that was the feeling I got after talking to him about it at length. He started getting pretty excited about coming down sometime and working on a receiver, then I remembered that I had a Guild build party not but a couple weeks later. An invitation was extended and accepted, then I hit the road home.

A couple weeks later on Friday afternoon, I got a text from Cormac asking if the event was still a go. Truthfully, I had all but forgotten his intent to come to the build party, and I figured that barring anything else, he would lose interest in the idea. It is, after all, a long drive to my house from his neck of the woods.

Not so, Cormac even came in early just so he could get a head start on set up and some basic instruction on the mill, not to mention he got to sit around and BS for a few hours about all kinds of gun building related stuff. For instance,
1. There is no limit to the number of guns you may build yourself
2. No serial numbers are required on a firearm you make on your own.
3.The difference between open bolt firearms, and closed bolt; and how it is literally NOTHING to building a submachine gun that fires fully automatically, but a semi auto requires much more work and forethought.
4. The silliness of federal laws like 922r, and others.

I crashed early on, knowing it was going to be a long busy day in a short while.
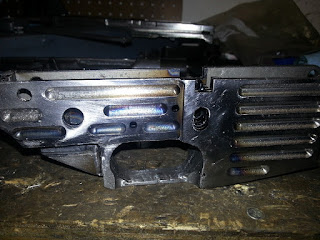
The next day, it was full swing building, and Cormac had absolutely no problems in following directions needed to drill and mill the magazine well and FCG pocket on his lower.

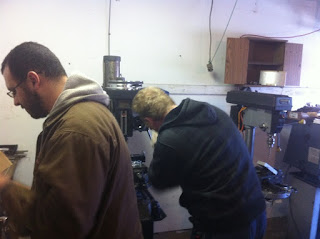
Some of our motley crew absorbing pizza by the box. Thank God for Little Caesars.


Cormac, (the blond one), seen here dodging sparks while my friend David cuts rivets off an AK trunnion.

Back to making his first gun.....

By the time the weekend was over, Cormac made huge strides in building his AR, and he got to run a milling machine for several hours. He probably would have been much closer to finished had I not been pulled away to several other guys' projects constantly, but he dealt with it in stride. Now, I just gotta get him back down here to finish it. That may be tough, but he has said he intends to have it built by DABIII
Cormac, you've been called out and challenged; you must have that lower making bang noises by Memorial Day weekend.


Here you have a guy who had never, ever even touched a machine tool in his life and was able to quickly overcome his shortfalls and insecurities and work on building a gun out of a block of aluminum. When asked if he would be interested in joining the Guild, or attending another build party, the answer was a resounding YES. That, my readers, is a successful day. I've gotten someone else hooked on my hobby, it's almost like the first time you take someone shooting and they get hooked on it.


Gun building for me isn't just about the guns, or the building, but about the community. It is close to the same, if not the same community as the gun blogging one, and it lends credence to the idea that gunnys are good people and worthy of the public's trust. In both communities, I've seen nothing but help and hope for the future.


I've been meaning to post this up for a couple weeks now, I promised Cormac I'd put his mug up on the internet for everyone to see. I had to come up with some random words to throw in the middle, and sometimes that is the hardest thing.

PMags, hard for Nazis to get.

$
0
0
I have watched this video several times and still can't help but laugh at it.


Its been around the internet for a few days but its still good. 

oh yeah. blog neglect.

$
0
0
I'm still alive.

I got a new job back around the beginning of February, and it was a great move for me. I went from being semi-professional to being in management. I got the company vehicle, decent salary, lots of paid time off, the whole works. It's a great job and I really like what I do, but it's cut into my spare time and has limited what I have time for.

I have several projects sitting here waiting to be made, and several I've worked on and just haven't done any updates over.
I was fortunate enough to have The Scribbler down to my humble abode a few weeks ago, it seems the thought of machining AR15 receivers was just too much for him, and he HAD to do it. Head on over to his site and take a look at his handiwork, and let him know he did a great job for his first time around the block.

http://scribblerscrawls.blogspot.com/2013/04/pics-or-it-didn-happen.html?showComment=1366244782183#c8325797505462693606

He did great in my opinion, and he is now the proud owner of two AR15 pattern rifles he built by himself. When he puts all the parts and pieces on them, he will be able to step back and truly say, "I built this." Not just assembled, mind you, but took-raw-materials-and-made-them-into-something. This is something that he will be able to learn from, improve on, and pass on to others. He is already talking about what to build next, whether a tube gun like a suomi, a 1911, a bull barreled nagant, and the list goes on.
I'm such a bad influence. First Cormac, now Scribbler.
I've also got two other blogger friends who have mentioned wanting to machine themselves a lower receiver, one of whom got two lower forgings mailed to him this week from a certain redneck.  Hopefully these bloggers will follow through and blog about their builds.


I didn't buy myself a gun for BAG day, but I did buy a VZ 61 Skorpion parts kit. It will be a little while before this kit gets built because I'm waiting on the federal paperwork to come back on it so I can SBR it.

There is another Dallas Area Blog Shoot coming up Memorial Day weekend, and I have a few guns I'd like to get built by then. We will see how that goes. Of course the weekend before the blog shoot, there will be another Builders Party at my house for members of the Weapons Guild. Maybe a few projects wjkk see daylight that weekend and get test fired the following weekend.

Anyway, I don't have tons of time for blogging anymore, or building guns for that matter, but I should have some beat stuff up soon enough.

More as I get to it.

T.R.E.

The puzzle piece AR15 receiver, (or my personal contribution to the gun control movement.)

$
0
0
I have heard a number of calls for gun bans for quite some time, especially for anything that looks or functions like the AR15. Over and over again, we are told that if we just get rid of the AR15, peace and prosperity will once again touch our nation. Criminals will realize the futility of their actions since they are no longer permitted access to the most dangerous and most powerful firearm ever known to man, and will voluntarily disarm and change professions. School buses full of children will no longer be at risk of being blown off the road by some madman, spray firing from the hip a black rifle with one of those never-ending 30 round clips magazines. Aircraft can safely transverse the skies once more, with no worries of one random skilled shot from the overwhelmingly powerful 5.56x45 cartridge.

Given that our benevolent government has worked so hard to protect us from.........uh, us, through their decision to ignore all the somewhat important issues and instead concentrate on the arbitrary non-issuesreally important issues, I thought it was time to show my appreciation for their efforts.

This is a AR15 lower receiver. Or rather, several of them.


So is this.


What is this, exactly?

It is what I like to refer to as a puzzle-piece AR15 lower. It is yet another way for someone to build a gun with little to no special tooling. While it was originally intended to be welded together, it could be soldered, brazed, epoxied, or even drilled and bolted together.

That's correct, you can make an evil black rifledeath machinehigh capacity ammunitions GUN that momma .gov has no control over, nor proof it exists. No paperwork, no background check, no problem.


Here is how they ship.


And here it is, mocked up for assembly.


(No, I don't make them. Don't email me and try to order one. If you want one, I'll ask the manufacturer when he plans to offer them to the public, and I'll put up a post about it.)


So, to all the gun control proponents out there who wish to deprive me of life, liberty, and pursuit of owning one of every firearm made (at least one, maybe more)........go ahead, buy one. You know you want to.

The "puzzle piece" AR15 lower is now available

$
0
0
If you had any interest in the weld-together "puzzle piece" AR15 receiver I posted about previously, the manufacturer is now releasing them for sale.

They are not listed as of 1330 central time 06092013, but the manufacturer says they will be up sometime today. If you are just too darn impatient to wait, email the owner and tell him TheRedneckEngineer sent  you.
I have no information about pricing just yet, as I've said before I have no connection to the manufacturer aside from being a overzealous customer.

Anyways, go bug Rick at http://www.theflatspot.net/ and feed your habit buy some very well made gun parts.

Making a .300 Blackout AR.........from a shovel?

$
0
0
Just kidding. No shovels needed.*

This post is one of a series I will be writing about the AR pattern rifle I am building in .300BLK


For starters, some background.....

The .300 Blackout, also referred to as the .300 blk, or just blk, is the brainchild of the Advanced Armament Corporation, or AAC. It is a .30 caliber cartridge that uses the 5.56x45mm parent case, and is trimmed down then necked out for a mid-weight .30 cal bullet. It allows anyone who has a AR15 to shoot an effective, accurate, powerful round using all the same equipment as the standard 5.56x45, except for the barrel. It can be loaded to subsonic levels, for very effective use with a suppressor, or to hypersonic levels as with any  normal rifle cartridge. It has taken the AR world by storm, and for very good reason.

(I know I'm not giving all of the little details on the round, but that's what the wiki link is there for.)

So, since I have mentioned on this blog before, I have machined several AR lower forgings (I've even welcomed fellow gunbloggers into my garage to machinetheirown and now need to build them into functional rifles. I've got plans for each of them, from different pistol calibers to standard 5.56, all the way up to a belt fed. One of them, however, will be in .300 blk, because I don't already have an AR in .300blk and everyone needs at least one AR in every caliber, right?

Since the everything about the .300 blk interchanges with the standard 5.56 AR, I've got a pile of parts here including bolt carrier groups, magazines, upper receivers, and furniture. The one thing I don't have is an overpriced .300blk barrel, and no matter where I looked, I couldn't find a barrel for less than a couple hundred bucks. My solution was simple; make my own.

I went over to the good folks at Green Mountain Barrel** and saw that, at the time, they had some 17" long .30 cal 1:10 twist barrel blanks for about 30 bucks apiece. I called some of my buddies up and got a group order going, then we all went in on a .300blk finish reamer and headspace gauges. That way, we all got a .300 blk barrel out of it for about 75 bucks each.


A barrel blank is just that, a rifled piece of alloy steel that has no chamber cut, nor a profile. Here is a pic of the barrel blank, sitting atop my table saw.


There is no chamber cut, it is just a rifled tube.


Since we are going to put this on an AR, the barrel must be turned for a barrel extension, which is what the locking lugs on the bolt engage with when the rifle is fired.
First, the barrel was turned between centers such that the entire outside diameter was parallel to the bore of the barrel, the ends were cut square and adjacent to the bore, and a .630" long section was machined down to .825" OD


Next, that same area is threaded 16tpi to match the barrel extension.

Next, we begin the task of chambering and headspacing the barrel. The barrel extension will be screwed on and off several times so we can check headspace using a GO gauge and the AR bolt.
Not shown in these pics is the floating reamer holder.


I got done chambering and headspacing, and was turning the rest of the barrel down to profile it when a very thick and razor sharp metal shaving caught me on my thumb, and cut my thumb from base to tip, all the way to the bone. Several stitches later, I've finally stopped spreading my DNA around, but this project is on hold until I can finish healing.


There's more yet to come on this installment. More as I get to it.


*No shovels were harmed in the making of this rifle.

**I've had very, very good results from GMB barrel blanks, I chambered and profiled a 20" .30 cal blank I purchased from them, for a Remington 700 in .300 WinMag.
The barrel worked out nicely, with several < 1" groups right off the bat. More than accurate enough to start with, and the groups get better as the barrel is broken in.


An update to the puzzle piece AR lower

$
0
0
I've been on light duty around the house while my hand is healing, so I haven't accomplished much.
However, I have worked on my puzzle piece AR lower, courtesy of Jack Squat's Flat Spot.


I've knocked quite a bit of weight off this already just by milling the slots in it. It's still approximately twice the weight of a standard milspec lower, but that's far from a problem.
Hopefully this weekend I will weld the buffer tube on.

This has been fun to tinker with since my dominant hand is mostly out of service, but welding has been a real challenge. Thankfully, most of the welds were easy to grind, file, and sand out.

More projects and work soon to come, I hope.

Sunday, H&K Sunday

$
0
0
I had a reader contact me last week about the conversion of Suomi drums to other 9mm firearms. I've gotten a degree of success in getting the drums to run in other weapons, but the Hi Point is still elusive. Out of 70-ish rounds, I still get 1-3 failures to feed. In an Uzi, a MAC, or an MP5, where there is a lot more room to work with in the mag, I have little to no trouble getting a reasonable feed. This reader wanted to know everything I knew about converting one for use with an Uzi, specifically a transferable machinegun. We did some story swapping and talking, and as it turned out, he was able to come visit the Redneck palace this last weekend.
Little did I know that he was bringing a ton of guns and ammunition, most of which were either NFA registered receivers or registered sears. I got to fire one of almost everything that H&K has ever made, including, but not limited to:
HK 11, 51,53,mp5, mp5k, mp5k reverse stretch, 23/21e, and two different 91's

There was also an AR15 with a DIAS , as well as a DLO Uzi and a Mac10 in .45acp, with a suppressed Lage upper. Aside from my carry piece, there was one other semi auto there, a Saiga 12. A Serbu Super Shorty made an appearance as well.
(Side note: if anyone ever hands you a H&K51 with a 50 round drum under it and an autosear, make sure you have a mouthguard in place, and earplugs under your outer hearing protection. A little suntan lotion wouldn't hurt, either. Jeebus, that was intense.)

The gentleman in question drove all the way from another state just to pick my brain and let me run some ammo through his MGs. I am still in awe of his immense generosity.

We spent Saturday working on a drum to see if we could get one of my designs to work in his gun, and we did indeed get one to cycle a full drum by hand in his gun simply by cycling the bolt (70 times!), so we knew we had something worth taking to the range and trying out.
At the range, it fed fine in semi auto, but the first time it was tried in FA, it had a couple of stoppages. These were due to friction, as we would later find out. I did some tinkering with the drum, loaded it all the way full, then did a complete drum dump (~70 rounds) in semi auto with no problems. Next, I tried it in FA, and had one stovepipe and two failures to feed, before I got about 65 rounds out of it in a row with no problem whatsoever. It ran and ran and ran. Even in full auto fire, I didn't think it was ever going to end.
Since it runs fine in semi, I believe friction kept it from keeping up with full auto feed rate. The owner of the Uzi took the drum home and is going to work on the friction issue, and maybe he'll come out with something worth making more of. I think he will, he's just got to get the bugs out.

 Anyway, enough talk. Let's look at machineguns, shall we?

 Here's the owner shooting his MP5k with a Vector drum under it
Me and a buddy shooting the MP5k

The AR15 with lightning link


The MP5K. I don't know the difference between this K and the last one I shot, except that the cyclic rate on this one is almost insane.


I believe this was a HK53


My all-time favorite of the day, the 51. MUST HAS NAO!

More of the 51


My friend shooting the Mac10 with Lage upper and can.

Shooting the MM11. This is just wrong. You don't put a gun like this in my hands and expect to take it back from me.


Shooting the 23e. THIS. IS. JUST. NOT. FAIR.


Shooting the same 23e, but with the bolt, feed tray, and barrel in for a 21. (In other words, going from .308 to 5.56 in a few seconds.)


I now know that the NFA34 was not drafted by a bunch of men wanting to reduce crime, but by a number of married women who were tired of their husbands bringing home new machineguns every day and sitting out in the back pasture shooting and ignoring the wives. There's just no way a woman can compete with a large machinegun collection until you either run out of ammo or something breaks.


A TON of gratitude goes out to my new-found-out-of-town friends Scott H. and Houston H.
I'm glad y'all tried to get in touch with me, and I hope we can/have come up with something functional with the drums for your Uzi.


Homebuilding an Uzi carbine.

$
0
0
I've built a good number of firearms over the years for my own enjoyment, some have worked well, and others have been less than reliable, but still fun to build and shoot. With that in mind, I've got some new stuff on the build list.

Latest among the list of fun projects is an Uzi. I actually built most of another kit over the last 4-5 months, but have just now gotten another kit and enough pictures together to post about.

First, a little background on the Uzi.......
You can simply go here and read up on a little info on the Uzi, and come back here when you're done. Now, like most pistol caliber machineguns, the Uzi is an open bolt blowback gun, which presents the usual problems for homebuilders like me. This means that I have to convert the gun to closed bolt only, and ensure that it can never be readily converted to fire in fully automatic mode, usually entailing a complete rework of all the internals of the gun.

I can't think of anyone, pro gun or not, who does not recognize the lines of the Uzi. The Uzi has been made famous by being featured in a number of movies, and has proven itself in real life through use by the IDF for a number of years, as well as several other countries' armed forces, including our own. The sheer cool factor alone is enough reason to own one, for me. Unfortunately, most of the current semiauto Uzis on the market are fairly pricey, and I won't even bring up the cost of buying a NFA-registered machinegun. This leaves only one way for cheapskates like me, and that is to build my own.

So, we start out with a demilled full size Uzi receiver. This has been torch cut to BATFE specifications, and is no longer a firearm. Because it is only scrap metal in the eyes of the BATFE, I can rebuild it into a semiauto configuration and it will then count as a US-made part for the purposes of 922r.
This is a mostly-complete Uzi kit that came in the mail the other day. It looks pretty hacked up, sure, but we will fix that in due time.
Mind you, not all the receiver pieces are present. I will have to either fabricate a few, or use pieces from other demilled kits, such as the ones that Apex sells. For what it's worth, I have no connection to Apex other than just being a very satisfied customer.


Before we go any further, I'll outline that one of the first things that I did was to grind the fixed firing pin off the bolt, that way there is no question of constructive possession. The bolt is soon to be modified to semi auto anyway, but I don't want to raise any eyebrows here. Everything I build is above board, and I go out of my way to ensure I meet the letter of the law. Here is a pic of the bolt with no firing pin, and a couple shots of the torched receiver chunks.


What we have here is a welding jig I machined, it's a block of 6061 aluminum stock clearanced for the feed ramp, ejector, and other items inside the Uzi receiver, and has copper plate sides. This allows me to weld the receiver together with no warpage, and does not allow the welds to burn through the sheetmetal. This jig fits very, very tightly inside the receiver, and any adjustment must be made with a rubber hammer.


Here I am aligning the front trunnion section with the next section of metal on the jig, and using a flat piece of aluminum to set the jig depth. The slag has been ground off the sheetmetal, as well as some of the paint on the edges to be welded.


 Now, I have the front half of the Uzi rewelded, or at least part of it is rewelded. I need to make some small filler panels to cover the larger gaps made by the cutting torch. I also have the rear two sections rewelded, and all I lack is the middle section of receiver, which I will cover at a later date. Before I can go any further in welding up the entire receiver, a blocking bar MUST be welded in the receiver to prevent insertion of an original, unmodified, full auto bolt. The blocking bar shows your intent to only use the firearm as a semiauto, and guarantees that a bolt with a fixed firing pin cannot function in the receiver. Once the blocking bar is welded in, the receiver pieces can be welded into a whole receiver.

The overall dimensions of the Uzi receiver will be set by a series of drawings, as well as using the parts that come with the kit to set spacing. The topcover will set the overall length, while the folding stock was used to set the spacing on the rear two pieces and the barrel was used to set the front two sections.


 Since I was tired of welding on the receiver, I moved over to the mill, and drilled out the bolt for a floating firing pin, and also started drilling out the area where a blocking bar will be in the receiver.
Below are two bolts that are in the process of semiauto conversion. A number of welding and milling operations are done to the bolts before they are semiauto compatible, and these still have a way to go.


If the Uzi is something that interests you, go check out www.Uzitalk.com and read up on the Uzi and its colorful history. If building one is on your bucket list, you should head over to the weapons guild and look into all the tutorials on how to build one of your own.
I'll have more on this build before too long.

D.A.B. 2.0, update

$
0
0
One more week until the infamous (on the internets) Dallas Area Blogshoot, v2.0.

Are your ammo cans ready?

Bob S. has a post up, asking folks to weigh in as to their presence at dinner and at the range. If you haven't already, go weigh in over there and let us know if you'll be attending either, or both.
Looks like it's going to be another fun one, guys.
Our weather has recently taken a turn for the better, I actually went outside for the first time in a long time without sweating up a storm. Let's all hope it holds that way.

There will be a few of us from the last blogshoot, and several new attendees.
If you're interested, drop Bob a note. We would love to have you attend, no matter where you're from, whether you blog, comment, read, or none of the above.

If you can't make the range until after noon on Sunday, drop me an email at
th3r3dn3c3ngin33rATgmail.com (replace the 3's with e's) and I'll get you my cell number so I can let you in the gate.

We are talking about doing this again in the spring, so if you can't make it this time around, watch Bob's blog for more info about DAB III.

 Polish your brass, oil your guns, clean the fuzz outta your hearing protection, and buff the scratches off of your safety glasses, cause we have a lot of shootin' to do.


That's all, folks. See some of you Saturday, and the rest of you on Sunday.

Converting the Uzi fire control group to semi auto.

$
0
0
Back on the Uzi carbine I'm building........

I ended the last installment of this project with two receiver sections that had been welded together out of four sections. Before I could go much further, I had to weld a blocking bar in place on the receiver, which is shown in the pictures below.
Once the blocking bar was in place and burned in, I took another receiver section from a demilled Uzi receiver I got from Apex gun parts. The receivers they sell aren't good for much, but they do have the necessary center section with the ejection port.
Here is the receiver in one piece. There is still a little grinding and sanding left to do on the welded areas, but for now, it's legally a firearm.


There was a small amount of burn through on the welds that hold the blocking bar in place, these were ground out with a Dremel tool.


Another shot of the quasi-finished receiver.


Now, as with any semi-auto that is built from what was originally a machinegun, you have to modify everything that once enabled the weapon to fire in fully automatic mode. The blocking bar welded in previously keeps a unmodified bolt from being inserted in the weapon, and I have to heavily modify the bolt for it to function in semi auto only.
The next item on the list is the lower, or grip area. A block is welded in place to keep the selector switch from going into the full auto notch. This is just a piece of 1/8" thick scrap metal I burned in and ground down. Nothing special, but it works.
 Here you can see that the selector is in semi auto mode, and is unable to be pushed forward into full auto.

 The selector in semi. You can see that the L shaped link cannot go any farther forward as it is blocked by the welded in metal.

Next, I put the trigger group back in.
Before I put the group back in, I ground the right hand side sear off, so it would no longer control the bolt movement. When I modified the bolts to semi (More on that in another post), I welded up the old sear trip areas, so even IF an unmodified lower were put in the gun (which it can't, more on that in a second), it would be useless as there are no sear surfaces left on the bolt.
 If you look closely, you can see the sear tab on the right side is missing altogether. The left sear tab remains, as that is how the striker will be controlled.

After these modifications were complete, I narrowed the notch at the front of the lower, and welded up the slot in the receiver to match. This way, the slot that the lower's front tab rests in cannot accept a full auto, unmodified lower. It can only accept my highly modified lower.
To top this off, I will also weld up the hole in the receiver where the right side sear hole is. This should show anyone who is paying attention that I have no intentions of ever converting this gun to fire fully automatic.

Next up is the bolt modifications and striker, but that will be the topic of another post.

I hope this, and all of my other building posts, are educational and fun, and inspire some of you out there to build your own legal Uzi carbine or pistol.

Modifying the Uzi bolt to semi auto

$
0
0
Continuing one with our Uzi project......
The SMG bolt must be modified in such a way that it can no longer be used as a fully automatic bolt, and can only be used to fire semi automatically. One shot per pull of the trigger, and all that.
This is probably the hardest part of building an Uzi, and requires the use of a milling machine. A drill press and a cutoff wheel could be used, but would also require abundant use of a file to get everything spot on.
Semiautomatic bolts can be purchased, however, in lieu of machining your own. I'm a real tightwad when it comes to stuff like that, and I own a number of machine tools, so I just forgo spending the money on the finished parts, and instead spend my money on screwing up one or two parts before finally lucking out and getting one right, in effect wasting twice the time and money that could have been spent on simply purchasing an off-the-shelf part.

Starting with pics from a previous post, we took our annealed bolts and drilled a hole in the rear of the bolt, all the way through to where the fixed firing pin was. This allows for a floating firing pin to be used.
We also drilled a 1/4" hole in the upper right corner of the bolt. This is to save us a little time on the mill, down the road.


Next, the sear "feet" on the front of the bolt are welded up. This is so the original sear will no longer control movement of the bolt. I laid a ton of weld on these areas, just so I knew that I wouldn't have to go back and add more after machining the welds down flat with surrounding areas. Hence the "gob-welded" look.
On the left, an un-modified bolt, in the middle, a welded bolt, and lastly, a bolt with the welds milled and sanded smooth.


Next, we will be revisiting that hole drilled in the upper right corner of the bolt. This hole is there so we can mill out a slot on the right side of the bolt and the bolt can now clear the blocking bar in the receiver. I milled this out with a 1/4" end mill, then started filing to get it to clear the bar by a few thou.


Here is more of the bolt with appropriate areas filed and sanded flat.


Now, we need to machine a large chunk out of the bottom right side of the bolt, so the semi auto sear has a place to ride. I thought I got a pic of this entire process, but it seems I only got a half-way-through pic.


After a couple of failed attempts to machine the striker (mainly because my milling machine is in pieces at the moment, getting some upgrades), I ordered a striker for the gun.

Since I'm building a carbine, the gun must have a 16" barrel, and have an overall length of 26" with the stock collapsed. In order to facilitate that, I had to make sure my barrel was long enough. I turned my barrel out of a 11" barrel blank, and machined a barrel extension 7.5" long that I welded on to the 11" barrel to make it a permanently-legal carbine barrel. Since I think the Uzi carbines look ridiculous with the "ant-eater snout" barrels, I used a piece of 6061 aluminum tube to make a fake suppressor, so the Uzi wouldn't look quite so dorky.
Here is the finished, raw metal Uzi, with the fake can on it. I intend to do a little machine work on the can to make it resemble a real suppressor, more than it does now.

I'll have pics up in a few weeks of the finished product, and hopefully a range report.

For the purposes of 922r, I have the following parts to replace the original imports.

Receiver -US
Barrel - US
Mounting Blocks (trunnions) - IMPORT
Bolt - IMPORT
Trigger housing -  IMPORT
Trigger - IMPORT
Sear - IMPORT
Disconnector - IMPORT
Buttstock - IMPORT
Forearm/handguard - US
Magazine body - IMPORT
Floorplate - IMPORT
Follower - IMPORT

That brings me to 10 import parts, which means I am legal and ready to go. I'm waiting on the striker and forearm/handguards to arrive.
There was once a letter from the BATFE that the Uzi had an operating rod that was subject to 922r, but they have since changed their opinion and said that the Uzi did not have an op rod, which is altogether correct.

More on this project as I get to it.........

How to build your own Uzi from a parts kit. Now a motion picture.

$
0
0
No sooner than I got the last parts in that I needed to finish my Uzi,  than a new kit arrived on my doorstep. This kit is a German/European kit, and is in great shape. It also came with what is known as a "center repair section" from the good folks at Global Machine and Tool. The repair section speeds up the build process by a factor of 10 compared to piecing together a bunch of demilled receiver chunks. You take some measurements, square off your front and rear receiver pieces, weld them on the ends of the repair section, (making sure your blocking bar is welded in as well), and then weld in a couple of small semi-auto pieces like a feed ramp and a stock mounting block, then rivet in an ejector, and you're done.
An inexperienced builder could finish an Uzi in a matter of hours if they used the GM&T repair piece.

Anyway, here's the video. I'm about as much of a film artist as I am a gunsmith, which is to say, not much.
Enjoy.


A reader's Suomi M31 build.....

$
0
0
A reader sent me pics of his M31 Suomi that he built using the pics, instructions, and drawings found on my site. I also machined his bolt, firing pin, and striker for him a while back.
I thought this was a fine example of a home-built firearm. He spent a lot of time working on the fit and finish. It shows, since the receiver is a sleeved reweld.
According to him, it runs 100% and is smooth as butter.

R.T., two thumbs up from this redneck on your build, and thanks a ton for sharing it.

Machine tools, going automated through the power of Computer Numeric Control

$
0
0
Been away from this for a while mainly due to school and work. I haven't had much spare time, and what time I've had has been spent on other things.

Anyways,
I've read a couple of posts from my good friend The Silicone Graybeard over the last few months that originally spawned this, but haven't had time to finish it.
I've had a lot of folks pick my brain along the way about what kind of tools they need to build their own firearms, and I've often said the same thing to a lot of them, "It's not what tools are in your toolbox, it's what you do with the ones you've got in conjunction with the most important tool of all, the one in your head. Anything beyond that just makes the job faster."
I bought a large lathe and a medium-sized mill instead of relying on lots of files and hard labor, but back when I started this blog, I didn't have a mill, I barely had a lathe, and I didn't have much experience. What I did have was the desire to build a .50 BMG rifle inexpensively, which I did do most of without the large mill and lathe.
Now that I've been doing this for a couple years (I think I started blogging about the .50 in late 2010), I've had the opportunity to pick up a number of different tools and improve some of the ones I already have. Here of late, I decided to upgrade my milling machine to CNC control. This will do the same thing that most any milling machine can do, but it will do it under computer direction and control. It also means that I can design something on my PC, then send it to the computer and let it make the part while I work on other things.
I looked at the cost of doing this, and figured it would be worth the trouble.

For those of you interested, the electronic hardware necessary to do this was about 150 dollars per axis, and the mill has three axis, X, Y, and Z. X is the longest traveling axis on my machine, and has about a foot and a half of travel, good enough to do large projects. Y is the back-and-forth axis, and has about eight inches of total travel. Z is the up-and-down axis that the cutting tool is attached to. This axis has about 5 inches of travel.
Both X and Y axis have acme thread screws that permit movement when the mill is new from the factory. Acme thread is very useful for high torque and high force applications, in part because the thread has a square appearance, rather than angled like the typical nut and bolt threads that you see.
Better than the Acme threads are what's known as "ball screws" and "ball nuts". Instead of having threads that mate to other threads, the "ball screw" has threads that are squared like Acme thread, but have a radius at the base of the thread leade. The "ball nuts" contain a number of small individual ball bearings, and the bearings will circulate inside the nut itself. These bearings fit in the radius of the screw leade, and allow for smooth travel, with very little backlash. I changed my mill over to ball screws for the CNC application. The upside of ball screws, as previously mentioned, is smooth travel and very little resistance to movement. The downside is that the screws offer little resistance to movement, so unless something is used to lock the screws in place, such as a engaged motor, you can literally push the mill table around by hand.

The Z axis is now an odd concoction that uses a rotating ball nut inside a timing pulley to lift the quill up and down. It works, though it is as ugly as a burlap sack of rusty nails.

I have a CAD program for designing my parts, and CAM program for taking the drawings from a simple image to a toolpath via a genre of computer language known as "G code". This code tells the computer what you want it to do, from cutting speeds, rapid movement speeds, cutter spindle speed, turning on coolant pumps, changing tools, etc.

ViaCad is what I draw and model my parts in, and MeshCam is what I use for converting those drawings to tool paths.

We have all at one time or another, seen a AR 15 lower receiver. On this blog, I have previously outlined how to manually machine a 0% lower forging into a finished receiver. Well, I now am able to clamp a forging into the mill and have the machine make all the critical measurements and cuts.
Observe:

Cutting the top deck on the lower forging.

Cutting the magazine release slot.

Cutting the pistol grip area
Cutting out the magazine well

Cutting the bolt hold open slot on the top deck.

Cutting the FCG pocket

Cutting the front take down pin area.


It took a little while to get to this point. I've broken a few end mills and ruined a couple of forgings getting this far, but the end result is very nice to behold.


So, that's a sample of what a CNC milling machine can do. It has made life much easier when it comes to building simple things like AR15 lowers, and has also made it easier to do much more complex things as well.

Machineguns are awesome.

$
0
0

Well, my semester finals are officially over, thus giving me back some free time once again.

I've got some updating to do and some new projects to document, as well as some parts reviews to do, so hopefully I'll have the engines running here again soon.

What did you do over your Thanksgiving weekend?

Me?

I had an 07FFL SOT come by the house with a Suomi kit built into a post 86 MG.

There is no doubt in my mind that it was likely one of my favorite machineguns I've ever shot. Shooting my semiauto Suomis is just dull and depressing now.

Here is a collage of the different machineguns the FFL brought with him, a H&K 51k, a H&K 53k, an M16, and the Suomi he built.


Another Uzi how-to video.

$
0
0


Here's another DIY video, showing the average builder how to convert a SMG uzi bolt to a semiauto closed bolt.
Enjoy.

Guess that barrel?

$
0
0
Not dead yet, just too busy for blog.

How about a game of "Guess That Project", using a pic of a barrel I machined?
Viewing all 52 articles
Browse latest View live